December 30, 2009

Have you got these errors during Patch creation / deployment?

This post discusses on some common build time as well as runtime errors that we come across while building the Software Updates aka Patches or Hotfixes. Click here for steps to create an uninstallable patch using InstallShield 2010.

Build Error: 6415
After selecting "Minor Update to Target RTM Version" from the Advanced section of the Patch Configuration properties, you may receive the following error:
ERROR: Patch Metadata property: 'MinorUpdateTargetRTM' is not a generic MSI property.
Cause: This error occurs as a result of a bug that exists in the current version of the PatchWiz.dll distributed by Microsoft as a part of Windows Installer.
Resolution: This bug should be resolved as of PatchWiz.dll version 4.0, which will be released with the Windows Vista Platform SDK and Windows Installer 4.0.
Workaround 1: You can temporarily work around this issue by following these steps:

  1. Set the Minor Upgrade to Target RTM Version property to "Yes" from the advanced view of the Patch Configuration. 
  2. Open the direct editor (Additional Tools -> Direct Editor) and locate the MsiPatchMetaData table. 
  3. Locate the row that contains the Property "MinorUpdateTargetRTM". 
  4. In the company column of that row, enter 1. 
  5. Re-build your patch.
Workaround 2: Sometimes Workaround 1 does not resolve the problem. In that case remove the text or the number 1 entered for the company column in the row that contains the Property "MinorUpdateTargetRTM" and re-build your patch.

Check the InstallShield KB for more details.

Runtime Error 1328
Description - the following error message is displayed "Error applying patch to file [2]. It has been updated by another means, and can no longer be modified by this patch. For more information contact your patch vendor. System Error: [3]"

Quick Fix - Using Patch Design View:
  1. Verify that all files being updated by the patch exist on the machine. If they do not, then you cannot apply a byte-level patch. To function properly, a byte-level update requires the exact copy of the file it was created for on the target system. 
  2. Navigate to the Patch Design View and select the appropriate patch configuration. 
  3. Select the Advanced Tab and find the Include Whole File field in the Build Settings section. Set this field to Yes. 
  4. Finish building the patch and apply the new patch.
For details refer InstallShield KB

Runtime Error 1646:
Description:
Even you create a un-installable patch, patch may not be uninstallable and there will not be any entry in ARP Panel.
Solution:
In Direct editor make sure that there are no new entries in table ‘Create Folder’. If any new entries are there, delete them. If any extra folder is there, then it makes the patch uninstallable.

December 29, 2009

How do you create an un-installable Patch using InstallShield?

Patches are software updates designed to fix problems in the installed product by providing a modified file(s) / registry entry or new file(s). This post explains how to create an un-installlation patch (either an Update.exe or .msp file) using Installshield 2010.
Steps to Build the Latest MSI for Patch Creation

  1. Copy the Base Installer or previous Hot fix folder (ism file, staging area etc.,) to a separate folder.
  2. Rename the ism file to PRODv1.0SPxxHFyy.ism in the new folder (SPxxHFyy)
    • Rename the previous Hot fix folder also to PRODv1.0SPxxHFyy
    • Delete any folders (PRODv1.0SPxxHFyy -1) related to previous within it
  3. Open the ism file and modify the following• Summary Information Stream -> Title as “PROD 1.0 (v1.00.xxyy)”
    -  Product Properties -> Name as “PROD 1.0 (v1.00.xxyy)”
    -  Product Properties -> Version of the product 1.0.xxyy
  4. Generate new Package Code
  5. Create a Path Variable - <PATCHDESIGN> pointing to PatchDesign directory, which will point to the uncompressed msi and product files for base product as well as latest version.
  6. If the same Patch is executed for the second time, it should be able to detect and prompt that the PATCH is already applied. You can achieve this with the following steps
    "Add a VBScript Custom Action (stored in binary table) to check if the version information for current installer (PATCH) and the Base Installer (already installed) are same, then prompt a message saying that the upgrade is already installed and abort. "
  7. In Direct editor make sure that there are no new entries in table ‘Create Folder’. If any new entries are there, delete them. 
  8. Edit the Path variables for staging area and installer resources to point to appropriate folder.
  9. Build the latest MSI and this will be your "Latest Installer" for Patch Design.
Creating a new Patch
  1. Go to Media -> Patch Design. Right click and select ‘Add New Patch Configuration’. Rename the new ‘PatchConfiguration1’ in the format PRODVVSPxxHFyy (say PROD10SP02HF01).  
  • Common -> De-select “Create Update.exe”, if you wanted to create an update as .msp file.
  • Common -> Select “Allow Patch to be uninstalled”
  • Add the uncompressed Latest msi built earlier, for the latest setup path
  • Advanced -
    i. Generate Patch GUID – No
    ii. Note down the Patch GUID for command line uninstallation
    iii. Include Whole files – Yes
    iv. If this is the first HF for this product line and there is no major upgrade previously set Allow Product codes to differ – No otherwise set to Yes
    v. Include Win9x engine – No
    vi. Include WinNT engine - No
    vii. Minor Update to Target RTM version (MSI 3.1 Required) – Yes. By setting this option to Yes, you can include only the Base MSI under the previous patch section and safely ignore the other msi’s between the Base and the current Patch.
    viii. Msi Engine Version\Schema - Version 3.1 (requires Windows 2000 SP3 or greater)
   2.  Under Previous setups add uncompressed Base MSI
        [Note: Even for successive patches, it is sufficient to include only Base MSI under Previous setups since we have selected Minor Update to Target RTM version (MSI 3.1 Required) to Yes.]

Command Line Switches for MSI and MSP Installations / Uninstallations:
Click here for command line arguments and the silent switches that can be used for msi and msp (un-installable patches).
I will write shortly on few build-time / run-time errors thrown in patch creation process and the steps to resolve the same.

December 18, 2009

Creating an Installer for new Product? Consider these cool tips, if the updates will be Patches.

  • Make sure the component best practices are followed especially to create one component per binary (say exe, DLL, chm, xml etc.,)
  • An Exe Custom Action, which has to be executed only during Base uninstallation, please add the condition as REMOVE=”ALL” instead of Installed, because sometimes during Patch uninstallation, EXE custom action is executed ruining the installation on the system. This is a limitation with Windows Installer versions prior to 4.5. However if you are using Windows Installer 4.5, the n feature “Custom action execution on update uninstall” lets you to an update add or change a custom action so that the custom action is called when an update / patch is uninstalled.
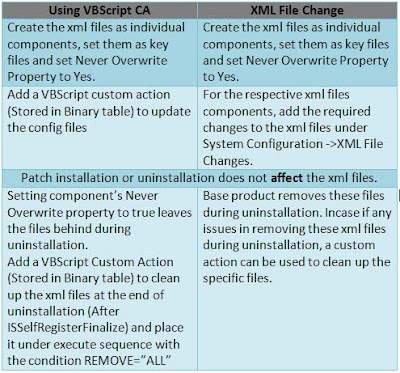
  • Updating XML files and preserve the changes during Patch installation / uninstallation
 

December 15, 2009

When do you prefer Shared DLLs over Merge Modules?

Merge modules are similar in structure to a simplified Windows Installer, which helps to integrate shared code, files (DLLs / OCXs), resources, registry entries, and setup logic to applications as a single compound file.

Drawback of using downloadable Merge Modules while re-packaging: Most of the merge modules are present in their respective shared location, if not; it’s downloaded from the web. As the files integrated with the installer is from merge modules, it does not require isolation.
When you don’t find the proper network for the Share location on web during installation, then the application / installation fails to function. This is the main drawback of the Merge Modules. Shared DLL concept can be used to overcome this issue.
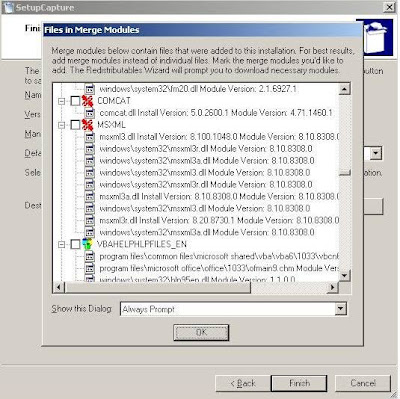
During the re-packaging process usually we don’t include the merge modules, that has to be downloaded during installation, in the WSI/MSI; this is to avoid the above mentioned network issues. The following screen shot shows how the merge modules will be excluded in the package:

In this case the DLL/ OCX files will be included directly within the WSI/ MSI.

Shared DLLs:
All the DLLs captured in the WSI/ MSI will be a shared DLL. When a DLL is already present in the machine and if we install the application, the DLL of the same version increments its DLL counter. Since the DLLs from the MSI are shared DLLs, any new application that would be installed on the same machine in future will increment the corresponding DLL count. All the Shared DLL counts can be viewed from the following registry location:
HKEY_LOCAL_MACHINE\SOFTWARE\Microsoft\Windows\CurrentVersion\SharedDlls When there is a DLL conflict found using Wise Conflict Manager, we go for Isolation. This is named as DLL Redirection.

What is DLL Redirection?
Since an executable imports API functions from DLL files, DLL redirection allows us to tell a program that the DLLs it needs are located in a different directory than the originals; in this way we can create a DLL with the same name as the original, which exports the same function names as the original, but each function can contain the code of developer’s choice.

There are two ways to achieve DLL redirection;

  1. “dot local” redirection:
    “Applications can depend on a specific version of a shared DLL and start to fail if another application is installed with a newer or older version of the same DLL. There are two ways to ensure that your application uses the correct DLL: DLL redirection and side-by-side components. Developers and administrators should use DLL redirection for existing applications, because it does not require any changes to the application. “
    In other words, dot local DLL redirection affords developers the ability to force an application to use a different version of a particular DLL file than that used by the rest of the system. For example, if an application called oldapp.exe only worked with an outdated version of user32.dll, then instead of replacing the user32.dll file in the system32 directory (potentially causing many other applications to break), you could tell it to load the older version of user32.dll from the program's current directory by creating an appropriate dot local file. All other applications will still load the newer DLL from system32 and remain unaffected. All that is needed is to create a dot local file (which is simply an empty file whose name contains the name of the target application followed by a .local extension; in this case it would be oldapp.exe.local), and place it and the older version of user32.dll in the same directory as oldapp.exe.
    Limitations with “dot local” redirection:
    Most notably, according to MSDN, certain DLL files (called 'Known DLLs') cannot be redirected in Windows XP (this restriction does not apply to Windows 2000). A list of all Known DLLs can be found in the
    HKEY_LOCAL_MACHINE\SYSTEM\CurrentControlSet\Control\Session Manager\KnownDLLs key; included in the list of known DLLs are kernel32.dll, user32.dll and gdi32.dll. However, this is not true - it seems that under Windows XP, an application will either allow you to redirect any DLL, or none at all. As such, if targeting a program running on the Windows XP platform, dot local redirection is an unreliable method, and should be used only on Windows 2000 machines.
  2. Using Manifest Files:
    Manifest files use the same naming convention as dot local files (i.e., oldapp.exe.manifest), but are not empty files. They must contain certain XML-formatted information in order to function properly, or else the target application will fail to load. In addition, manifest files are only supported on Windows XP and Vista; however, they are far more reliable than using dot local redirection, and allow us to redirect any DLL file. (NOTE: The testing was done under Windows XP only; it is possible that some restrictions/changes may be applied to Windows Vista).

Window 2003 Server – “Service Unavailable” on IIS webpage

All of a sudden the web applications installed on Windows 2003 Server with IIS 6.0 stopped working.
  • Observed that IIS is running and all the windows services related to installed web application is up and running. 
  • Restarting IIS and web application related services was of no help. 
  • Enabling Isolation Mode (Web Sites Properties -> Services -> Isolation Mode -> Run WWW service in IIS 5.0 isolation mode).
Later on identified that Windows security updates installed on Dec 9th 2009 have caused the problem.

Solution:
Initially uninstalling the following Windows security updates and restarting the machine have fixed the issue.
KB976325
KB973904
KB973917
KB971737
KB974318
KB974392
Exploring further could help us narrow down that by just removing Windows Update KB973917, the 'Service Unavailable' issue will be resolved. However while removing it says KB974392 may not work properly. On resrting the machine IIS & WebApplications are working properly.

December 11, 2009

New to Blogspot!.. Some Cool Tips to create a blog

Tips to setup your first blog on blogspot.com:

  1. Sign into blogspot.com with your Google Account, if not create a Google account for yourself and proceed.
  2. Create a blog id (like http://installjournal.blogspot.com/). You can create any number of blogs with Google account and can make them public (which can be searched by search engines) or private.
  3. Choose appropriate blog template and all set for blogging. Any time you can change the blog template to change the look and feel of your website. Further there are plenty of blog templates available for free on the web.
    [Note: Please make sure to take a backup of the existing template before changing to a new one.]
  4. How does your blog reader contact you? Sharing the email directly might lead to lots of spam’s too and not a general practice either. Go for Contact Forms. - there are plenty of them readily available and added to your blog in no time.
    I have used www.kontactr.com and its very simple. Here you go to integrate it with your blog.
    • Register with Kontactr
    • Copy the Script say something like this, but ID might be different for your registration
      <script type="text/javascript"> id = ID; </script>
      <script type="text/javascript" src="http://kontactr.com/wp.js"></script>

    • Modify Post options by using some old date for the Contact Form post, disable / hide comments & Back links.
    • Publish it. Your Contact Form is ready.
  5. FeedBurner - FeedBurner makes it easy to receive content updates in My Yahoo!, Newsgator, Bloglines, and other news readers.
    Register your blog with FeedBurner and add your feed address (say http://feeds.feedburner.com/installjournal) in your blog. Once this is set, Subscribe To in your blog can take the reader to the feed burner URL.
  6. Google Analytics -Register with Google Analytics using your Google account and add the code provided to your template just before the tag. Google analytics will help you to monitor the traffic over your website or blog even to individual page level, time spent on each site etc.,
    The code would look similar to this, where you would need to replace XXXX-X with you Analytics ID / No.
    <script type="text/javascript">
    var gaJsHost = (("https:" == document.location.protocol) ? "https://ssl." : http://www/);
    document.write(unescape("%3Cscript src='" + gaJsHost + "google-analytics.com/ga.js' type='text/javascript'%3E%3C/script%3E"));
    </script>
    <script type="text/javascript">
    try{
          var pageTracker = _gat._getTracker("UA-XXXX-X");
          pageTracker._trackPageview();
    } catch(err) {}
    </script>

  7. Google Adsense - Google AdSense is the program that can give you advertising revenue from each page on your website—with a minimal investment in time and no additional resources. If you feel you have enough web pages with good number of readers, Of course you register and start with Google Adsense.
  8. Wondering about losing your articles / data that you have published? No Worries! Google does regular backup.
    It’s better to save your template xml, which you might overwrite sometime and would end up losing all the configurations, that you have done in all the previous steps.
Thank you Vijay for your inputs. Hence forth, you can refer this article instead of explaining for the newbie's.

December 9, 2009

Directory structure design for Installers, which facilitates future updates

This post provides a folder structure design, which can be used while creating the installer for the first release or base version of a particular product. This helps to maintain the installer project files, support files for the installer, merge modules (if any), product staging area etc., The format should work with any Installer authoring tool like InstallShield, Wise, WiX or InstallAware. The following image depicts the directory structure design.


Note:    The above folder structure is designed to isolate dependency on the Packagage authoring tool's installation directory but however for InstallShield, the Setup-Prerequisites should still be under <InstallShield InstallDir>\SetupPrerequisites.             

InstallerProject
    Installer project file (say .ism for InstallShield) and associated folder
    Example:
        PRODv10.ism & PRODv10
        PRODv10SP1.ism & PRODv10SP1
        PRODv10SP1HF1.ism & PRODv10SP1HF1
Docs
    Installer design and related documents.
PatchDesign
This folder will be used only when you are working on upgrade as a Patch and not for Service Packs. This has the uncompressed msi file related to the minor upgrade and product files / folders.
             BasePRODv1.0 –base version
             Latest(PRODv1.0HFyy) – for any subsequent Hotfixes.
StagingArea
This folder will have the files resources / files to be bundled with the installer. The same folder can be used for the StagingArea all successive updates (as patches) or service packs
  • <PRODv1.0> - base version
    • SupportDir – files used at the time of installation say dialog images, splash screen, billboards, Custom actions etc.,
    • msm – In-house as well as 3rd party merge modules used by the installer
    • <PRODv1.0DeploymentStructure> - product binaries in the deployment structure. It is always recommended to have the product staging area similar to the deployment structure, which will help during maintenance.
  • <PRODv1.0SPxxHFyy >
    Similar to base version structure and this contains the updated files / folders for the respective Service pack or Hotfix. So the actual folder name can be PRODv1.0SP02 or PRODv1.0SP02HF03 based on the release what you are working on.
    • SupportDir
    • msm
    • <PRODv1.0SPxxHFyyDeploymentStructure>

December 8, 2009

Some Packaging & Deployment Definitions / Acronyms

Definitions:
Setup - Setup is an application or process that allows you to package up your application into an easy-to-deploy format, which can then be used to install the application on the target server.

Deployment - Deployment is the process of taking the application and installing it in on another machine, usually by the use of a setup application.

Installation - Installation of a program is an act of putting an application into the computer system where it can be executed. Click here for more installer related jargons.

Bootstrapper (from Wikipedia) - Bootstrapper is usually a small executable file (e.g. setup.exe) which updates the installer and starts the real installation after the update. Sometimes the bootstrapper installs other prerequisites for the software during the bootstrapping process too.

Acronyms:
MSI - Windows Installer (formerly Microsoft Installer)
MSM - Merge Module
CM - Configuration Management
SCM - Software Configurtion Management (Source Control Management)
CR - Change Request
CNR - CanNot  Reproduce
SP - Service Pack
HF - Hotfix
RC - Release Candidate
RTM - Release to Manufacture

December 4, 2009

InstallShield Tips

This article has some tips for InstallShield users
Splash Screen Display
For a basic msi project, the splash screen will be displayed only when you create a Setup.exe and not the compressed (or single) msi.

Setup pre-requisites
For a basic msi project, the Setup pre-requisites can be bundled only when you create a Setup.exe and not the compressed (or single) msi.

Abort & Rollback
For Rollback to happen, the abort must happen between the InstallInitialize and InstallFinalize actions, and must be a deferred action.

Hide ARP Entry
Set ARPSYSTEMCOMPONENT=1 in Property Manager.
[Note: Verified this with Basic MSI Project created using InstallShield 2009 (SP2).]

InstallShield project file format
InstallShield supports binary as well as xml format for storing InstallShield project files. The default is binary however the xml format is best for the speed of opening and saving the project file. It also allows you to manipulate the project file using the Windows Installer API. The XML format is best for use with source control systems. It allows you to manipulate the project file using XML Utilities.

Windows 2008 Support
Windows 2008 Server is support only from InstallShield 2009 onwards.
Note: InstallShield 2009 help says that Windows Vista and Windows Server 2008 have the same major and minor version numbers. Therefore, the installation considers Windows Server 2008 to be the same as Windows Vista; thus, components that are marked for Windows Vista are also installed on Windows Server 2008.

December 2, 2009

BangaloreITPros UG Meet - SharePoint 2010 & Windows 7 ACT 5.5 Overview

I had been for BangaloreITPros’ (BITPro) monthly User Group meet over the weekend (Nov 28th 2009). Glad that the 3 hours I spent over there was useful.

There were two sessions - SharePoint 2010 Beta Technical Overview & Windows 7 Application Compatibility Toolkit 5.5 Overview

SharePoint 2010 - by RaviKanth from M/s Dell India Pvt. Ltd.,, spoke about new features and System requirement too

  • Granular backups using central admin sit, helps to recover small units of data.
  • Windows Powershell support
  • Ability to restore from unattached databases.
  • Improved upgrade process
  • To be released in first half of 2010
SharePoint 2010 supports only x64 OS with 64bit SQL Server (2005 or 2008), so the x64 system requirement could be a bad news for those who use SharePoint 2007 and planning to upgrade to 2010.

The Slide Deck for the SharePoint 2010 Technical Overview can be found here and Joel’s blog on SharePoint has lot more for us.

Windows 7 ACT 5.5 Overview – by Vijay Raj from Texas Instrument
Vijay gave an overview of Windows 7 Core OS changes and a detailed explanation of how the Application Compatibility Toolkit (ACT) 5.5 can be used to mitigate the AppCombat issues, like how the compatibility issues can be detected and fixed using ACT either during development or deployment phase, in a corporate environment for supporting new versions of Microsoft Windows Operating System.

The Slide Deck for the same is available here.

Bangalore .Net (BDOTNET) user group has some events in pipeline for the developers.

November 28, 2009

How to register a .Net assembly into GAC in a development environment

This article focuses on ways to register .Net assembly into GAC in a development / build environment and NOT applicable for deployment hence should NOT be bundled with the installer.
1. Using Gobal Assembly Cache Tool (gacutil.exe)
  • gacutil allows you to view and manipulate Global Assembly Cache.
  • GACUTIL doesn't come with the .NET Runtime, but with the .NET SDK - also a free download, but not part of the basic redistributable. So it should NOT be used for deployment.
  • Regiser -> Use the property variable to invoke gacutil.exe
    Syntax - gacutil.exe -i
  • UnRegister -> Use the property variable to invoke gacutil.exe
    Syntax - gacutil -u
2. You can also install your assembly into GAC, just by copy it into C:\WINDOWS\Assembly directory in explorer.
3. You can also use System.EnterpriseServices.Internal.Publish.GacInstall to register assembly into GAC.

Click Here to read more on how to register a .Net assembly into GAC using InstallShield or RegAsm.exe

November 27, 2009

How to write into MSI Log File from Custom Actions using Installshield

Writing into MSI Log file from Custom Actions

InstallShield, by default, handles logging the start / end & success or failure of the Custom Action into MSI Log and here is the code snippet, from an InstallShield document, for writing detailed information into MSI Log file from the Custom Actions. The custom action can be written in InstallScript, VBScript or DLL.
InstallScript Sample
In an InstallScript custom action, you can call SprintfMsiLog to write a string to the MSI log file. For example, the following InstallScript code prototypes and defines an InstallScript custom action called LoggingTestInstallScript.

#include "ifx.h"
// standard custom action prototype
export prototype LoggingTestInstallScript(HWND);
// custom action definition
function LoggingTestInstallScript(hInstall)
begin
     SprintfMsiLog("Calling LoggingTestInstallScript...");
     // return success to MSI
     return ERROR_SUCCESS;
end;
In order to be called, the custom action must be scheduled in the sequences. For this example, open the Custom Actions view and create an immediate-mode InstallScript custom action called callLoggingTest that calls the LoggingTestInstallScript function, and schedule it to run after LaunchConditions.

Click here for the full article from InstallShield which details on writing to MSI Log file from VBScript as well as DLL Custom Actions.

November 26, 2009

Windows Installer Overview

Windows Installer Service:
Windows Installer Service helps to install, modify and remove applications provided as MSI Package. The first Windows Installer version was 2.0 and it was released with Windows XP. The latest one is Windows Installer 5.0 released with Windows Server 2008 R2 & Windows 7.
Installation Mechanism
There are two phases to a successful installation process: acquisition and execution. If the installation is unsuccessful, a rollback phase may occur.
  • Acquisition: At the beginning of the acquisition phase, an application or a user instructs the installer to install a feature or an application. The installer then progresses through the actions specified in the sequence tables of the installation database. These actions query the installation database and generate a script that gives a step-by-step procedure for performing the installation. This is user-interface part of the installation
  • Execution: During the execution phase, the installer passes the information to a process with elevated privileges and runs the script. This is the execution part of the installation which actually modifies the system.
Features of Windows Installer:

  • Rollback: WIS includes the computers’ pre-installation state in its database, so it can support complete installation rollbacks in the case of a problem during installation, returning the target system to the same state it was in before the installation began.
  • Repair: WIS stores the software configuration in its database and hence it can automatically repair an installation, when a problem occurs with the program. This repair mode can be run through a maintenance mode, but it is also automatically run each time a user launches a program through its shortcuts or through opening of a document generated by the program.
  • Elevation: In secured environments like Vista / Windows 7, the WIS, which is always running in the background, can automatically elevate a user’s privilege during installation to insure that the installation will occur properly in locked-down environments.
  • Resiliency: Resiliency is a program's ability to recover gracefully from situations in which a vital component is missing. By authoring an installation package and by using the Installer functions, developers can use Windows Installer to produce resilient programs that can recover from such situations.
    Resiliency can be turned ON or OFF for a file / registry key by specifying / removing the KeyPath value for each component.
    Click here for more information on resiliency.
  • Advertise: Advertised application can create shortcuts, registry keys, file association etc., without actually copying files to the target computer. The product will be installed by triggering the entry point (say by means of a Start menu shortcut, by opening a document that the product is configured to handle, or by invoking an advertised COM class). When advertised, the application will be installed as explained in Install on demand.
    Two types of advertising viz- Assigning & Publishing
    For assigned application, the user has an entry point like shortcut to activate the application on-demand.
    For published application, the user does not have an entry point to activate installation-on-demand and the application can be installed only if another application activates the published application.
  • Install on demand: Installation-on-demand makes it possible to offer functionality to users and applications in the absence of the files themselves. This notion is known as advertisement. The Windows Installer has the capability of advertising functionality and to make installation-on-demand of application features or entire products possible. When a user or application activates an advertised feature or product, the installer proceeds with installation of the needed components. This shortens the configuration process because additional functionality can be accessed without having to exit and rerun another setup procedure.
  • Remove / Retire: WIS can completely remove the application from system, as all the configurations are tracked in its database
Detect Windows Installer Version Installed:
There are three different ways in which you can detect the version of Windows Installer installed on your system.

  1. Using MSI.DLL
    Search MSI.DLL in Windows Folder, Locate the file, RightClick –> Properties -> Version Tab -> Product Version. 
  2. Getting Help on MSIEXEC
    Type msiexec /? Or msiexec /help on command prompt
  3. Scripting
    Create a VBS File – DisplayMSIVersion.vbs and type in the following code
    set installer = createobject("windowsinstaller.installer")
    msgbox "MSI Version - " & installer.version
    Save & Run to see the MSI Version
Windows Installer Architecture:


MSI consists of Installation instructions and Software parts to be installed i.e. usually .cab files within or along with MSI
MSI contains an installation database (relational) that WIS uses to perform installation
Product
  • highest level in hierarchy
  • Identified by Product code or Product GUID
Feature
  • Basic building block from end user’s perspective and it can have sub-features too.
  • Each item that can be selected or unselected for installation is a feature or sub-feature.
  • Features can be shared across applications.
  • WIS does not remove the shared feature until all the application using the shared feature is removed.
  • Example: Spell checker in Office, which is shared across Excel, Word Applications.
Component
  • Features are made up of components and it the basic building block from developer’s perspective.
  • Component has a unique GUID, which WIS uses to identify it within the installation database.
  • A component is a collection of files, registry keys, shortcuts, create / manage NT Services which are generally called as resources.
  • Component Rules: Component rules ensure that the authors of installation packages create packages that do not damage the components of other installations or leave resources after uninstall.
    • All files in a given component must be installed to the same directory. Conversely, files installed to separate folders must belong to separate components.
    • There can be only one key path per component
    • Any two resources that might ship separately in subsequent versions should exist in separate components. Resources should be grouped into the same component only when you are certain that these resources will never ship separately. Versioned resource should not be shipped in more than one component.
    • All primary resources (DLLs, EXEs, for example) always exist in separate.
    • Same file cannot be the key file in two different components which will go into a common feature.
Key Paths:
  • A key path is a specific file, registry key, or ODBC data source that the package author specifies as critical for a given component. Because a file is the most common type of key path, the term key file is commonly used.
  • A component can contain only one key path; if a component has no explicit key path, the component's destination directory is taken to be the key path. 
  • When an MSI-based application is launched, Windows Installer checks the existence of these critical files or registry keys (that is, the key paths). If there is a mismatch between the current system state and the value specified in the MSI package (e.g., a key file is missing), then the related feature is re-installed. This process is also known as self-healing or self-repair. 
  • No two components should use the same key path.

November 18, 2009

Reading ComputerName - VBScript & InstallScript Samples

Often we have a requirement to read the target computer name to update INI / config file etc., and this article discuss the different ways to read the Computer Name in Script, which can be used within any installer.
VBScript
 Function GetCompName
          Set objNetwork = CreateObject("WScript.Network")
          ComputerName = objNetwork.ComputerName
          GetCompName = ComputerName
 End Function

InstallScript
function STRING  GetCompName()
       STRING szKey, szName, svValue;
       NUMBER nvSize, nvType;
begin
      szKey = "System\\CurrentControlSet\\Control\\ComputerName\\ComputerName";
      szName = "ComputerName";
      // Set the default root.
      RegDBSetDefaultRoot(HKEY_LOCAL_MACHINE);
      // Retrieve the registry key value.
      RegDBGetKeyValueEx(szKey, szName, nvType, svValue, nvSize);
   return svValue;
end;

November 17, 2009

How to configure user & local group on target computer using InstallShield

Net.exe is a process, which belongs Windows OS can be used to create / delete users, local groups and add domain users to local group

  • Checking the user in existing domain
           net user <user>/<domain>
  • Add / delete Users to existing local group
           net localgroup <localgroup> <domain>\<user> /add
  • Create / delete a local user
           net user<user> <pass> /add
           net user <user> / delete
  • Create / delete a local group
           net localgroup <localgroup Name> /add /comment:”….”
           net localgroup <localgroup Name> /delete
The following functions are InstallScript implementation to create / delete the specified Local group which can be directly used in InstallScript / InstallScript MSI Projects. The same can be written as Custom Action for Basic MSI Projects
These functions are compatible IS 12.0 & above, further it might work on previous versions of InstallShield too.

Function Declaration:
          Prototype CreateLocalGroups(STRING);
          Prototype DeleteLocalGroups(STRING);

Function Definition:
//---------------------------------------------------------------------------
//CreateLocalGroups()
// Description: This function creates the specified local group
//INPUT:
//               szLocalGroupName – Local group to be created
// OUTPUT:
//               N/A - No return value
//---------------------------------------------------------------------------
function CreateLocalGroups(szLocalGroupName)
       STRING szProgram, szCmdLine, svDummy, svBatchFilePath, svBatchFileName;
       NUMBER nResult, nvResult, nvFileHandle;
begin
        svBatchFilePath = SUPPORTDIR;
        svBatchFileName = "createlocalgroups.bat";
       // Set the file mode to append.
       OpenFileMode (FILE_MODE_APPEND);
       // Create a new file and leave it open.
       if (CreateFile (nvFileHandle, svBatchFilePath, svBatchFileName) != 0) then
                   // Report the error.
       else
                  // Batch file create successfully
                 szProgram = "net.exe";
                 szCmdLine = "localgroup “ + szLocalGroupName + “ /add /comment:\"Members in this group are granted the administration rights\">createlocalgroups.log";
                 WriteLine(nvFileHandle, szProgram + " " + szCmdLine);
      endif;
      CloseFile ( nvFileHandle );
      ChangeDirectory(SUPPORTDIR);
      nResult = LaunchAppAndWait(svBatchFilePath ^ svBatchFileName,"",LAAW_OPTION_WAIT
LAAW_OPTION_HIDDEN);

      if (nResult = 0) then
                GetFileInfo ( SUPPORTDIR ^ "createlocalgroups.log" , FILE_SIZE , nvResult , svDummy );
                if (nvResult = 0) then
                          //Local Groups create successfully
               else
                          MessageBox ("Failed to create Local Groups. Installation Continues..", INFORMATION);
               endif;
      else
               MessageBox ("Failed to create Local Groups. Installation Continues..", INFORMATION);
      endif;
end; // End of Createlocalgroups


//---------------------------------------------------------------------------
//DeleteLocalGroups()
// Description: This function deletes the specified local group
//INPUT:
//           szLocalGroupName – Local group to be deleted
// OUTPUT:
//           N/A - No return value
//---------------------------------------------------------------------------
function DeleteLocalGroups(szLocalGroupName)
              STRING szProgram, szCmdLine, svDummy, svBatchFilePath, svBatchFileName;
              NUMBER nResult, nvResult, nvFileHandle;
begin
             svBatchFilePath = SUPPORTDIR;
             svBatchFileName = "deletelocalgroups.bat";
             // Set the file mode to append.
             OpenFileMode (FILE_MODE_APPEND);
             // Create a new file and leave it open.
             if (CreateFile (nvFileHandle, svBatchFilePath, svBatchFileName) != 0) then
                        // Report the error.
             else
                       // Batch file create successfully
                       szProgram = "net.exe";
                       szCmdLine = "localgroup “ + szLocalGroupName + “ /delete\">deletelocalgroups.log";
                       WriteLine(nvFileHandle, szProgram + " " + szCmdLine);
             endif;
             CloseFile ( nvFileHandle );
             ChangeDirectory(SUPPORTDIR);
             nResult = LaunchAppAndWait(svBatchFilePath ^ svBatchFileName,"",LAAW_OPTION_WAIT
LAAW_OPTION_HIDDEN);
             if (nResult = 0) then
                         GetFileInfo ( SUPPORTDIR ^ "deletelocalgroups.log" , FILE_SIZE , nvResult , svDummy );
                         if (nvResult = 0) then

                                       //Local Groups deleted successfully
                         else
                                        MessageBox ("Failed to delete Local Groups. Installation Continues..", INFORMATION);
                         endif;
             else
                          MessageBox ("Failed to delete Local Groups. Installation Continues..", INFORMATION);
             endif;
end; // End of Deletelocalgroups

November 16, 2009

Issue in Minor Upgrade - Files not copied or overwritten

The Requirement for minor upgrade and the steps to create it in InstallShield was discussed already in the previous article. As a continuation to that we will discuss the most common issue with Minor Upgrade and the solutions for the same in this article.

Issue in Minor Upgrade - Files not copied / overwritten during upgrade
If the files are bundled with the installer by linking the folders dynamically with include subfolders enabled, then upgrade completes without any errors but further exploring would reveal that none of the folders / files were copied / replace during upgrade mode.

A closer look at Community discussions and Knowledge base in Macrovision / Acresso provides enough information to conclude that this issue persists in InstallShield Developer 7.04, 8.0, 11.0 & 12.0.

[Note: In fact the problem may or may not exist with other versions of InstallShield but I didn’t have an opportunity to check them.]

Explanation:
In your previous release (say for eg. v1.0),
    a) if the same component was already existing.
    b) if that component was set to pick files using "Dynamic File Linking" option with "Include all subfolders" option checked.
    c) if that component was really had at least one subfolder in it

If all of the above are TRUE in your previous release that you are trying to minor upgrade, then the files in this component will not be upgraded during upgrade.

Solution 1:
This solution is applicable for the setup authors, who have release the base version and working on the minor upgrade:
Base Installer: Assume the base installer is released with “Dynamic File Linking” and the “Include all subfolders” option is checked.
Minor Upgrade: Integrate each folder (main folder / subfolder) with dynamic linking option but UNCHECK “Include all subfolders”.

Example:
  • Base release had F1 (feature) -> C1 (component) -> 20 files, Config & Help sub folders.
  • During minor upgrade, because of subfolders (Config & Help) in dynamic link, modified files may not be copied to the target machine.
  • In IDE, I just renamed the F1 to "F15" and also renamed the component from "C1" to "C15" and then set to include *only* the files dynamically and unchecked the "Include all Subfolders" option for not to include subfolders.
  • For the each of other subfolders "Config" and "Help", I created a separate component and set to include *only* the files dynamically.
  • Modified the component settings in the old Feature "F1" to not to include subfolders and included just files for "C1". I did not try to remove this component. I am not sure that would that give me an error or not. You can try modifying this first and then try removing it forever.
  • To the build command-line, you *must* specify REINSTALLMODE=voums REINSTALL=WebFiles ADDLOCAL=WebFiles15
    FYI:
    REINSTALLMODE - please refer HELP; there is a big explanation available.
    REINSTALL takes the name of the Features (separate multiple features by comma) that you had in the previous release and wanted to upgrade now.
    ADDLOCAL take the name of the Features (separate multiple features by comma) that are newly added in this release.
Limitation:
      The above solution would be very tedious if the number of folders and subfolders are more. Click here for the related Installshield community link.

Solution 2:
The solution is applicable to the Setup Authors, who are in design phase of Base Installer and foresee a minor upgrade for the same.
Base Installer: Include one of the files as a static file (instead of as a dynamically linked file), set it to be the key file of the component C1, and select the Always Overwrite check box in that file's properties. Then, for the dynamic file link for the same component C1, exclude that one static file specifically.
Minor Upgrade: With the above setting, all of the dynamically linked files are overwritten because the component's key file--the static file--is set to always be overwritten.

Example:
I just did a quick test to confirm this. My base installation had one component with several dynamically linked HTML files and one static HTML file. I marked the static file as the key file and selected the Always Overwrite check box in the file's properties. For my minor upgrade, I deleted one of the dynamically linked files in the source folder and added a new HTML file. When I ran the base installation and then the minor upgrade, the deleted file was removed and the new file was added.

[Note: Basic MSI projects and InstallScript MSI projects let you mix static and dynamic files in the same component. (InstallScript projects do not; each component in an InstallScript project contains only dynamic or static files.)]

Warning!:
Dynamic file linking should be used with caution. If you inadvertently delete a dynamically linked file from the source folder that your dynamic link references, InstallShield does not display any build warnings or errors. Your product may install without any issues, but it may not work as expected, without the dynamically linked file that was inadvertently deleted.

In most cases, it is best to avoid using dynamic file links for critical executable files—such as .exe, .dll, or .ocx files—especially if your product requires them in order to run successfully.
About Author

Bhuvana is into Configuration Management, Specialized in Application Packaging, Source Control Management & Build Automation. This blog mostly revolves around these three areas.

How to Register .Net assembly into GAC using InstallShield 2010

Deploying .Net assemblies into Global Assembly Cache can be done using either regasm.exe tool  in .Net SDK or using InstallShield IDE. This article discusses them in detail

Using Assembly Regstration Tool (regasm.exe) - Basic MSI, Installscript MSI & InstallScript Projects
  • User 'System Search' inInstallShield IDE or FindAllFiles() in script to locate the regasm.exe from 'C:\WINDOWS\Microsoft.Net\Framework', which will set the path to a property variable (already defined in property manager) 
  • Register -> Use the property variable to invoke regasm.exe
    Syntax -
    regasm <Assembly file name with path>  /codebase /tlb:<AssemblyName>.tlb
    [Note: The above command registers all public classes contained in <AssemblyName>.dll, and generates and registers the type library <AssemblyName>.tlb, which contains definitions of all the public types defined in <AssemblyName>.dll.] 
     
  • For InstallScript Project, 'System Search' is not available in IDE, so we can use InstallScript to reigster assembly using regasm.exe
    if ( FindAllFiles ( WindowsFolder ^ "Microsoft.NET" ^ "Framework", "regasm.exe", svResult, RESET ) == 0 ) then
             svPath = INSTALLDIR ^ "<AssemblyName>.dll /codebase /tlb";
             LongPathToQuote ( svPath, TRUE );
             if (LaunchAppAndWait ( svResult, svPath, WAIT ) < 0) then
                    MessageBox (" Unable to launch " + svPath + ".", SEVERE);
             endif;
    endif;
  • UnRegister-> Use the property variable to invoke regasm.exe
    Syntax - regasm.exe -u <Assembly file Path>
 Using Installshield IDE - Basic MSI & Installscript MSI Projects
  • Open the new or existing Installshield project from which you need to register an assembly into cache.
  • Go to Tools -> Options -> Preference Tab ->  Self Registration and keep the following two items selected.
    • Com Extraction will occur during the build time
             [Note: If this item is not selected, then you would get the following error at runtime
               'Error 1935 An error occurred during the installation of assembly component  <Component GUID> HRESEULT 0x800700B07]

  • Create a component and add the assembly to be registered into GAC to the new component and set it as a key file.
  • Set .Net COM Interop property to 'YES'
  • For Windows Installer projects (Basic MSI and InstallScript MSI), each component contained in the project has a .NET COM Interop setting. Setting this option to Yes will run regasm.exe against the component's keyfile at build and import the registry information into the built installation. If the destination for the component is [GlobalAssemblyCache], the /codebase parameter is passed as needed to regasm.exe at build time.
  • InstallShield 2009 / 2010 uses the regasm assembly from the path stored in 'DotNetRegasmPath' under HKEY_LOCAL_MACHINE\SOFTWARE\InstallShield\15.0\Professional
  • Build & test the installer to see the new file registered into GAC.

November 12, 2009

How to create Custom Dialog Themes for Basic MSI Project in InstallShield 2010

InstallShield provides some good default Themes and if you wonder how to create your own Custom Themes, which displays your product specific images on the Installation GUI, then this article is for you. This article explains the steps to create / use Custom dialog Themes in Basic MSI Project, which is an undocumented feature of InstallShield.
Steps to create Custom Dialog Themes
1. Go to <Installshield Installation Directory>\Support\Themes
2. Create a .Theme file say “My Custom.Theme” with following content
<?xml version="1.0" encoding="UTF-8"?>
<Theme Name="My Custom Theme" Path="My Custom Theme" Preview="preview.jpg" SetupImage="setup.gif">
<Transform id="welcome">
         <Add Control="Image" Type="Bitmap" Region="0 0 374 234" Attributes="1" Source="welcome.jpg"/>
         <Add Control="DlgLine" Type="Line" Region="0 234 374 0" Attributes="1"/>
</Transform>
<Transform id="interior">
         <Add Control="Banner" Type="Bitmap" Region="0 0 374 44" Attributes="1" Source="banner.jpg"/>
         <Add Control="BannerLine" Type="Line" Region="0 44 374 0" Attributes="1"/>
</Transform>
<Apply Transforms="welcome">
        <Match Size="374 266"/>
        <Include>
                <Name>AdminWelcome</Name>
                <Name>SetupCompleteError</Name>
                <Name>SetupCompleteSuccess</Name>
                <Name>SetupInitialization</Name>
                <Name>SetupInterrupted</Name>
                <Name>InstallWelcome</Name>
               <Name>MaintenanceWelcome</Name>
               <Name>PatchWelcome</Name>
               <Name>SetupResume</Name>
               <Name>SplashBitmap</Name>
               <Name>Exterior</Name>
        </Include>
</Apply>
<Apply Transforms="interior">
         <Match Size="374 266"/>
         <Exclude>
                  <Name>AdminWelcome</Name>
                  <Name>SetupCompleteError</Name>
                  <Name>SetupCompleteSuccess</Name>
                  <Name>SetupInitialization</Name>
                  <Name>SetupInterrupted</Name>
                  <Name>InstallWelcome</Name>
                  <Name>MaintenanceWelcome</Name>
                  <Name>PatchWelcome</Name>
                  <Name>SetupResume</Name>
                  <Name>SplashBitmap</Name>
                  <Name>Exterior</Name>
        </Exclude>
</Apply>
</Theme>
3. Create a folder say “My Custom Theme” along with “My Custom.Themes” file
4. Create the following images carrying your logo / brand / trademark with the below mentioned specification and copy them to
“<Installshield Installation Directory>\Support\Themes\My Custom Theme” directory

5. Launch InstallShield IDE, Open the existing project / Create New project
6. Go to User Interface --> Dialogs --> Themes, select the newly created theme ‘My Custom Theme’
Now all the dialogs either default or custom will have the New Theme.

January 11, 2009

Contact Form