December 2, 2020

Excited to present in AWS reInvent 2020

 Even in the virtual world, AWS went to reInvent their global annual conference and ensured to reach you.
I am pretty excited to present in AWS reInvent 2020 - DevChats on Understanding multi-account management


Here is my session recording if you have registered for reInvent 2020 & Slide Deck


Here is what went on behind the making of reInvent recording session after your topic was selected. Worth appreciating the effort gone for getting this mega virtual event up from AWS.

1. Received Recording Kit (iPod 12 32 GB, Ring Light with iPod holder, R-Series Backdrop, Tripod holder for Backdrop). I am equipped with a perfect recording kit.
2. 1-hour Tech Check Point with recording team
3. Uploaded the Slide Deck for review that was edited per process by Content Team
4.  1 hour of group training on making great presentations by Montanna (http://www.montanavonfliss.com/)
5.  1:1 training/review with Montanna - quite interesting.
6.  Recording for 90 mins (slot is either 3:00 to 5:00 am or after 9:30pm IST). I choose early morning n weekend so that kids are out of reach. The upload took over 2 hours with 100 MBPS fiber-optic connection. Hats off to the technician who stood by for 4 to 5 hrs with one speaker 😌)
7.  Review the recording and get it fixed for deviations with 48 hours

September 13, 2020

Knowledge Sharing Spree - Proudly presented at two big events in a single day

Transformational DevOps with AWS Native Tools


Women in Tech Day (Community Edition) is a full day online conference aimed to inspire, educate and bring the women IT professionals together through technical discussions, demos and networking opportunities with AWS experts.

SlideDeck

Linkedin

Session Recording

Embracing Security in DevOps in-light of AWS


Join the leaders of DevSecOps from around the globe for one day of virtual learning to unveil the evolving trends and tools in Security. Unfold the innovations & transformations on security that these leaders are driving in their large organizations
by adopting DevSecOps.Exchange your insights with top practitioners and experts in DevSecOps who will share their real-time experience that works. That's in https://devopsindiasummit.com/ 

Preview

SlideDeck

LinkedIn

Session Recording

August 21, 2020

AWS Certified Security - Speciality

#lockdown learnings personified!! While staying safe during pandemic, got little deeper to secure Amazon Web Services (AWS) cloud workloads.
Yes, added 
#SecuritySpeciality to #awscertificate list.

July 19, 2020

In the making of bhuvana.pro with S3 Route 53 ACM CloudFront

Long time wish of building a personal website & self hosting with custom domain, all happened over two weekends. 
Here you go with steps followed in the making of bhuvana.pro after developing the static website. 
The entire blog is detailed out with three stages. You can stop at any stage but still have working website with custom domain.
  1. Stage 1 - Static Website hosted on S3 routed with Route 53
  2. Stage 2 - Static Website hosted on S3 routed with Route 53 & CloudFront with ACM for SSL
  3. Stage 3 - Stage 2 + CI CD for deploying static website

Table of Contents

AWS Services Used

  • S3
  • Route 53 
  • Amazon Certificate Manager
  • CloudFront
  • AWS CodeCommit
  • AWS CodeDeploy
  • AWS CodePipeline

Best Practise
  • Ensure to tag all the resources that you create.
    • S3 root domain & logging bucket
    • CloudFront Distribution
    • Route 53 - Hosted Zone
    • ACM - public certificate 
  • I have create two tags as (Name: Bhuvana.pro and Usage: website), which will help for resource grouping and cost analysis.
  • To standardize example.com and www.example.com is used as root and subdomain through out this article


Detailed Implementation Instructions

Stage 1: 

We will be implementing Static Website on S3 routing to Custom domain (example.com) using Route 53 where Custom domain is registered with GoDaddy.com. This will be implement from Steps 1 to 9. 

Static Website hosted on S3 with Route 53


Step 1:

Amazon Route 53 is a highly available and scalable Domain Name System (DNS) web service. You can use Route 53 to perform three main functions in any combination: domain registration, DNS routing, and health checking. In our tutorial, we will be using Route 53 for DNS routing with external site for domain registration. Read here for more details on Route 53

Register your favourite domain based on availability.  I registered with GoDaddy just to integrate external domain with Route 53; otherwise registering a domain with Route 53 will automatically create a hosted zone for you.

Step 2:

Amazon Simple Storage Service (Amazon S3) is storage for the internet and static website hosting functionality helps you to host a static website on S3 bucket without need to provision and manage servers to meet the scale. Read here for more details on how to use S3.

Create an S3 bucket for the root domain (say example.com) and upload the content for your static website

Step 3:

Create an S3 bucket for subdomain and configure that to redirect to the domain bucket

Step 4:

Create a hosted zone in Route 53 for the registered domain name and copy the NS Record server details to update in GoDaddy.com
If you have registered domain with Route 53, this is handled automatically by AWS.

Step 5:

Add the NameServers in GoDaddy.com.
Remember to exclude the trailing dot while copying the server names.

Step 6:

Now that you have created two S3 buckets for hosting and redirecting, lets check if its working by copying the endpoints of S3 buckets to the browser. Yes, Website is up with S3!


Step 7:

Its time to route the domain / subdomain to access the website hosted in S3. You will have to create two record sets under the hosted zone pointing to the S3 buckets example.com and www.example.com

Step 8:

To watch the website traffic, you can enable logging on the root domain s3 bucket and store that logs in logs.example.com under prefix logs/


Step 9:

Test the websites with root domain and subdomain as follows


Stage 2

We have the website up & running, but how secured it is ? Good to have SSL integration. But S3 does not support SSL Integration, hence let's use Amazon CloudFront to deliver the static website from S3 secured with a public certificate created from Amazon Certificate Manager (ACM).

Static Website hosted on S3 with Route 53 with CDN


Step 10:
Amazon Certificate Manager helps you to easily provision, manage & deploy public and private SSL certificates. Read here for more details 

Important note: You should create the SSL only in N.Virginia region for usage with ACM. 

Step 11:

Amazon CloudFront is a web service that speeds up distribution of your static and dynamic web content, such as .html, .css, .js, and image files, to your users. CloudFront delivers your content through a worldwide network of data centers called edge locations. When a user requests content that you're serving with CloudFront, the user is routed to the edge location that provides the lowest latency (time delay), so that content is delivered with the best possible performance. Read here for more details on CloudFront.

Let's create a Web distribution in Amazon CloudFront to act as a CDN for our static website hosting

Step 12:

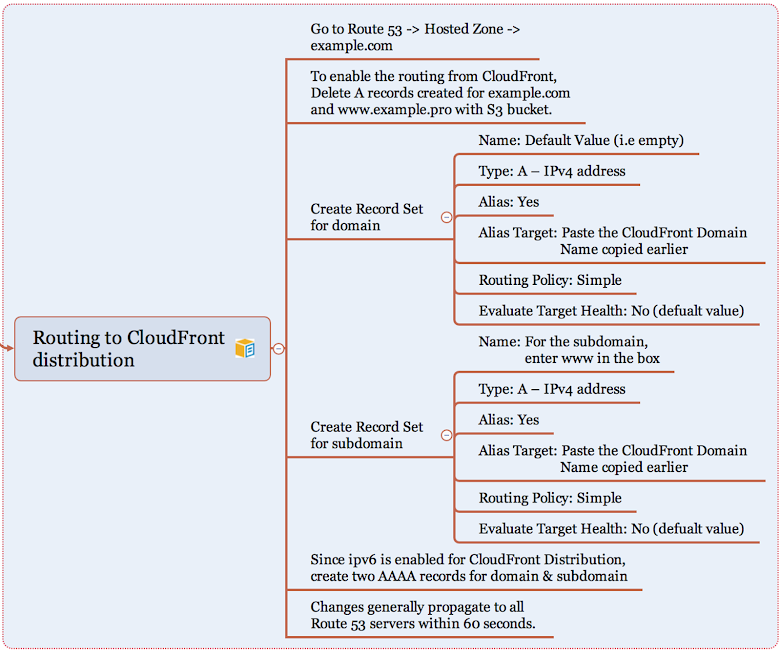
In Step 7, we routed the domain / sub domain to access the website hosted in S3. delete those record sets and create two new record sets to point to CloudFront domain.
If ipv6 is turned on for the CloudFront distribution, create two more record sets.

Step 13:

Your website is up & running with SSL Integration

Step 14:

Well, now your website can be browsed via S3 endpoint without SSL & via root domain & subdomains with SSL.

That isn't enough. Further, why should user access S3 content directly when we have SSL integration for your domain in place ?

Let's go in for Origin Access Identity t
o restrict access to content that you serve from Amazon S3 buckets and here are the steps:
  1. Create a special CloudFront user called an origin access identity (OAI) within CloudFront console and associate it with your distribution.

  2. Configure your S3 bucket permissions so that CloudFront can use the OAI to access the files in your bucket and serve them to your users. Make sure that users can’t use a direct URL to the S3 bucket to access a file there.

After you take these steps, users can only access your files through CloudFront, not directly from the S3 bucket.

Click here to read more about OAI and follow the below instructions to setup


Step 15:

Try accessing the content via S3 endpoint.. Hope you are getting 403 Forbidden ?
First time you can be happy about getting Access Denied Error. Hurray!!

Now your website should be only accessible via your root domain and subdomain delivered through CloudFront distribution.

Hearty Congratulations for successfully setting up your secured static website along with me.

Stage 3

As a DevOps person, an implementation is incomplete without a source control repository for versioning to the website changes  and seamlessly integrating the changes to S3 bucket through a DevOps pipeline and here is the architecture..  


                   Static Website hosted on S3 with Route 53 with CDN + DevOps Pipeline

Pricing

If you wanted to explore how much is your expenditure on the monthly basis, go to My Billing Dashboard to Activate Cost Allocation Tags for Name & Usage that we have created for all resources. Activating tags for cost allocation tells AWS that the associated cost data for these tags should be made available throughout the billing data pipeline. Once activated, cost allocation tags can be used as a filtering and grouping dimension in AWS Cost Explorer, as a filtering dimension in AWS Budgets, and as a dedicated column in the AWS Cost & Usage Report.

Reference Links


July 3, 2020

Demystifying DevOps for #IEIIndia and IGEN Innovation Consortium

While the Institution of Engineers #India#IEI is stepping into their #Century Celebration, joined hands with the IGEN Innovation Consortium (I2C) in organizing series of "Online Lectures" on Trending Topics, I was super stoked to present on Demystifying #DevOps with Traditional DevOps & #awscloud DevOps Services. And most importantly for my first ever talk to the Indian Govt backed statutory body that strives to promote and advance the engineering and technology in India. I am sure they take everystep help reach latest in the technology to people from all walks of life - be it student, staff, working professionals in private and government sector. Amazing efforts..

Here you go with the Slide Deck bit.ly/DemystifyingDevOps
and stay tuned for more such sessions hosted by #IEI and IGEN from Youtube channek

https://www.ieindia.org/
http://theigen.org/innovation/

Thanks to IEI TNSC Chairman for hosting the event and Suresh Seetharaman for the invite.

June 23, 2020

Lockdown Learnings - Recap of April - June 2020

COVID-19 have taught us loads of untold life lessons and ofcourse laid a platform to share our knowledge manifold be it in Industry Conferences or to the Inquisitive Budding Engineers from various Engineering Colleges across India. 

Long pending in-person visits to the Engineering colleges turned to be an engaging online sessions. 

Can't believe that it turned out to be 5 Industry Conference and 5 College sessions.


Social Media links
  • Fundamentals of Cloud Computing & AWS, WiMLDS Mysore   

  • CI CD using AWS Developer Tools, AWS UG Delhi   

  • Application & Account Monitoring in AWS, AWS UG India  

  • Fundamentals of Cloud Computing & AWS, Bangalore Institute of Technology   

Upcoming conferences:

June 22, 2020

Infor Security Hero

Thank you Infor for recognizting with Infor Security Hero Award by Jodie Ward for "Developing your understanding and knowledge of cyber security threats not only demonstrates your commitment to safeguarding Infor’s information and assets, but also shows you understand the importance of cyber security awareness."


May 23, 2020

Hosting a Simple WebApp on AWSCloud

We are going to host a simple web application on Linux & Windows EC2 instances and here are the Key requirements:

Requirement #1
  •  Create a VPC with Internet Gateway, two route tables, two subnets in two availability zones
  •  Define separate Network Access Control List (NACL) and Security Group for the two EC2 instances
  •  Setup two EC2 instances - Linux & Windows on public subnet with Apache & IIS configured on port 80 
  •  Ensure that application use custom index page named webindex.html
  •  Website should be served from the 2 GiB additional EBS Volumes
  •  Setup an Application Load Balancer to distribute traffic to the Linux and Windows servers  in a round-robin fashion which means that requests to the Application Load Balancer on port 80 will get re-directed to the Apache and IIS web servers listening on port 80.
  • Code the website to fetch the static content like images / videos from S3 Bucket. 
  • Validate website is being served over ALB public DNS.

Requirement #2
  • Create an AMI out of Linux & Windows EC2 Instances
  • Create 2 Launch Configurations with the AMIs created in previous step with the same instance specification as in RFE #1
  • Create Auto Scaling Group (ASG) with the above Launch Configurations to scale in when CPU > 80% and scale out when CPU < 80%
Requirement #3
  • Create a CloudFront distribution -> WebDistribution and point to ALB public endpoint

Services Used
  • EC2 - Linux & Windows 2019, EBS, ALB, ASG, S3
  • Region used: Mumbai


Requirement #1 Architecture Diagram


    Step 1: Network & Security Group Setup


    VPC
    • Switch to ap-south-1 region (Mumbai)
    • Create a VPC with a Name tag WebVPC with IPv4 CIDR block 10.0.0.0/16 leaving IPv6 CIDR block and Tenancy as default.
    • Create Internet Gateway as WebIGW and attach to the VPC - WebVPC
    • Create two route tables WebRT-Public and WebRT-Private with WebVPC selected
      • Add a route to WebRT-Public pointing to the Internet Gateway - WebIGW
    Subnet
    • Create two Subnets with Name tag as WebSubnet1-Public & WebSubnet2-Public for two availability zones in in ap-south-1 region with WebVPC 
    • Set the CIDR block to 10.0.1.0/24 & 10.0.2.0/24 respectively
    • Go to public route table WebRT-Public, click on Subnet Association and select both the subnets

    Network Access Control Lists (NACL)
    • Create two Network ACLs with Name tags as WebNACL1 & WebNACL2. 
    • Since NACLs are state-less, inbound and outbound rules have to be enabled explicitly
    • Add the following rules for both inbound and outbound for WebNACL1
       Rule # Protocol Port Source
       100 SSH 22 0.0.0.0/0
       110 HTTP 80 0.0.0.0/0

    • Select Subnet Associations of WebNACL1 and pick WebSubnet1-Public
    • Add the following rules for both inbound and outbound for WebNACL2
       Rule # Protocol Port Source
       120 RDP 3389 0.0.0.0/0
       130 HTTP 80 0.0.0.0/0

    • Select Subnet Associations of WebNACL2 and pick WebSubnet2-Public
    Security Groups
    • Create two Security Groups with Name tag as WebSG-Linux & WebSG-Win and set the VPC as WebVPC
    • Since Security Groups are stateful, enabling inbound is sufficient
      • Add the following inbound rules for WebSG-Linux
         Protocol Port Source
         SSH 22 0.0.0.0/0
         HTTP 80 0.0.0.0/0

      • Add the following inbound rules for WebSG-Win
         Protocol Port Source
         RDP 3389 0.0.0.0/0
         HTTP 80 0.0.0.0/0

      • Note: Best practise is to use specific port rage or specific port instead of 0.0.0.0/0
      • Please note by default all outbound connections are allowed.


      Step 2: Setup Linux EC2 with Apache & host custom index page


      Instance Configuration

      Create an EC2 instance with the following configuration
                     
       Instance Spec        Values
       AMI Amazon Linux v2
       EBS Volume - Root 8 GiB
       EBS Volume - Additional 2 GiB
       VPC WebVPC
       Subnet WebSubnet1-Public
       Security Group WebSG-Linux
       Create New Key Pair webkeypair
        Name tag WebLinuxServer

      User Data

      #!/bin/bash

      # Install Apache Web Server
      sudo yum install -y httpd

      # Turn on web server
      sudo chkconfig httpd on   # httpd service comes up on reboot
      sudo service httpd start

      # Setup web server
      cd /var/www/html

      echo "<html><h1>Hello AWS Aspirants – I am running on Linux over port 80</h1></html> " > webindex.html 

      Default Web Page setting

      vi /etc/httpd/conf/httpd.conf to view the default document
      to change the default document edit the following line 

      DirectoryIndex  webindex.html index.html


      Step 3: Setup Windows EC2 with IIS & host custom index

        Create an EC2 instance with the following configuration
                       
         Instance Spec        Values
         AMI Amazon Windows 2019 Base Image
         EBS Volume - Root 30 GiB
         EBS Volume - Additional 2 GiB
         VPC WebVPC
         Subnet WebSubnet1-Public
         Security Group WebSG-Linux
         Create New Key Pair webkeypair
         Name tag WebWinServer


        User Data

        # Install & Configure IIS
        <powershell>
        Set-ExecutionPolicy Unrestricted -Force
        New-Item -ItemType directory -Path 'C:\temp'
         
        # Install IIS and Web Management Tools
        Import-Module ServerManager
        install-windowsfeature web-server, web-webserver -IncludeAllSubFeature
        install-windowsfeature web-mgmt-tools

        # Create custom index.html
        Set-Location -path C:\inetpub\wwwroot
        $htmlcode = " <html><h1> Hello AWS Aspirants - I am running on Windows Server Over Port 80 </h1></html>" 
        $webindex | ConvetTo-Html - Head $htmlcode | Out-File .\webindex.html

        </powershell>


        Tips: <persist>true</persist>
        By default user data commands are run once when the instance is first launched. If you would like your commands to run every time the instance is started you need to include the <persist>true</persist> at the end in your user data.

        Manual IIS Setup

        IIS Installation on Windows 2016
        Create Windows 2019 EC2, RDP, Install & Configure IIS with this instructions

        Go to C:\inetpub\wwwroot
        rename iisstart.htm to iisstart_original.htm
        create webindex.html and place
        <html><h1>Hello AWS Aspirants – running on Windows & IIS Server – on port 80</h1></html>

        Save the file and run http://localhost on same EC2 or use public URL from outside

        Default index.html Setting: 
        Search -> iis -> Default Web Site -> Default Content (double click this to view the default documents) 

        Add webindex.html as default page.

        Step 3: Create an Application Load Balancer and point to EC2 public endpoints


          Step 4: Create S3 Bucket and upload Static Images for Website

          • Create a S3 Bucket named simplewebapp101
          • Upload the static files that you want to place in the webpage rendered from Linux or Windows EC2
          • Make the objects public
          • Create an Instance Role with S3 Read-Only access and apply to both Windows & Linux EC2
          • Edit the webindex.html to update with the new image URL stored in S3 Bucket and refresh the web page using ELB endpoint
             

            Requirement #2 Architecture Diagram


            Requirement #3 Architecture Diagram
            DIY