- Stage 1 - Static Website hosted on S3 routed with Route 53
- Stage 2 - Static Website hosted on S3 routed with Route 53 & CloudFront with ACM for SSL
- Stage 3 - Stage 2 + CI CD for deploying static website
Table of Contents
AWS Services Used
- S3
- Route 53
- Amazon Certificate Manager
- CloudFront
- AWS CodeCommit
- AWS CodeDeploy
- AWS CodePipeline
Best Practise
- Ensure to tag all the resources that you create.
- S3 root domain & logging bucket
- CloudFront Distribution
- Route 53 - Hosted Zone
- ACM - public certificate
- I have create two tags as (Name: Bhuvana.pro and Usage: website), which will help for resource grouping and cost analysis.
- To standardize example.com and www.example.com is used as root and subdomain through out this article
- S3 root domain & logging bucket
- CloudFront Distribution
- Route 53 - Hosted Zone
- ACM - public certificate
Detailed Implementation Instructions
Stage 1:
We will be implementing Static Website on S3 routing to Custom domain (example.com) using Route 53 where Custom domain is registered with GoDaddy.com. This will be implement from Steps 1 to 9.
 |
| Static Website hosted on S3 with Route 53 |
Step 1:
Step 2:
Step 3:
Step 4:
Create a hosted zone in Route 53 for the registered domain name and copy the NS Record server details to update in GoDaddy.com
If you have registered domain with Route 53, this is handled automatically by AWS.
Step 6:
Now that you have created two S3 buckets for hosting and redirecting, lets check if its working by copying the endpoints of S3 buckets to the browser. Yes, Website is up with S3!
Step 7:
Its time to route the domain / subdomain to access the website hosted in S3. You will have to create two record sets under the hosted zone pointing to the S3 buckets example.com and www.example.com
Step 8:
Step 9:
Stage 2
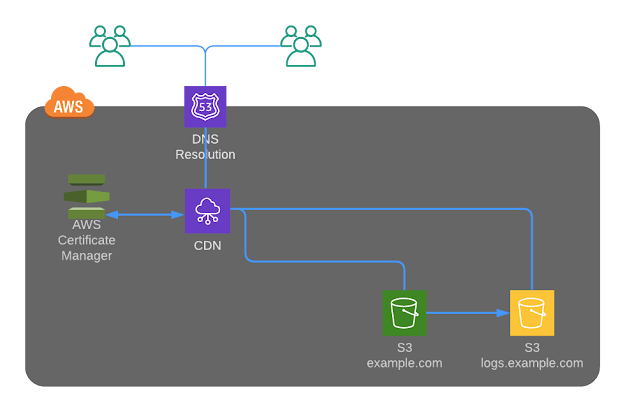
We have the website up & running, but how secured it is ? Good to have SSL integration. But S3 does not support SSL Integration, hence let's use Amazon CloudFront to deliver the static website from S3 secured with a public certificate created from Amazon Certificate Manager (ACM).
 |
Static Website hosted on S3 with Route 53 with CDN
Important note: You should create the SSL only in N.Virginia region for usage with ACM.
Step 11:
Let's create a Web distribution in Amazon CloudFront to act as a CDN for our static website hosting
Step 12:
If ipv6 is turned on for the CloudFront distribution, create two more record sets.

Step 13:
Step 14:
That isn't enough. Further, why should user access S3 content directly when we have SSL integration for your domain in place ?
Let's go in for Origin Access Identity to restrict access to content that you serve from Amazon S3 buckets and here are the steps:
Create a special CloudFront user called an origin access identity (OAI) within CloudFront console and associate it with your distribution.
Configure your S3 bucket permissions so that CloudFront can use the OAI to access the files in your bucket and serve them to your users. Make sure that users can’t use a direct URL to the S3 bucket to access a file there.
After you take these steps, users can only access your files through CloudFront, not directly from the S3 bucket.
Click here to read more about OAI and follow the below instructions to setupStep 15:
First time you can be happy about getting Access Denied Error. Hurray!!
Now your website should be only accessible via your root domain and subdomain delivered through CloudFront distribution.
Hearty Congratulations for successfully setting up your secured static website along with me.
Stage 3
As a DevOps person, an implementation is incomplete without a source control repository for versioning to the website changes and seamlessly integrating the changes to S3 bucket through a DevOps pipeline and here is the architecture..
 |
| Static Website hosted on S3 with Route 53 with CDN + DevOps Pipeline |
Pricing
If you wanted to explore how much is your expenditure on the monthly basis, go to My Billing Dashboard to Activate Cost Allocation Tags for Name & Usage that we have created for all resources. Activating tags for cost allocation tells AWS that the associated cost data for these tags should be made available throughout the billing data pipeline. Once activated, cost allocation tags can be used as a filtering and grouping dimension in AWS Cost Explorer, as a filtering dimension in AWS Budgets, and as a dedicated column in the AWS Cost & Usage Report.


No comments:
Post a Comment