December 30, 2009

Have you got these errors during Patch creation / deployment?

This post discusses on some common build time as well as runtime errors that we come across while building the Software Updates aka Patches or Hotfixes. Click here for steps to create an uninstallable patch using InstallShield 2010.

Build Error: 6415
After selecting "Minor Update to Target RTM Version" from the Advanced section of the Patch Configuration properties, you may receive the following error:
ERROR: Patch Metadata property: 'MinorUpdateTargetRTM' is not a generic MSI property.
Cause: This error occurs as a result of a bug that exists in the current version of the PatchWiz.dll distributed by Microsoft as a part of Windows Installer.
Resolution: This bug should be resolved as of PatchWiz.dll version 4.0, which will be released with the Windows Vista Platform SDK and Windows Installer 4.0.
Workaround 1: You can temporarily work around this issue by following these steps:

  1. Set the Minor Upgrade to Target RTM Version property to "Yes" from the advanced view of the Patch Configuration. 
  2. Open the direct editor (Additional Tools -> Direct Editor) and locate the MsiPatchMetaData table. 
  3. Locate the row that contains the Property "MinorUpdateTargetRTM". 
  4. In the company column of that row, enter 1. 
  5. Re-build your patch.
Workaround 2: Sometimes Workaround 1 does not resolve the problem. In that case remove the text or the number 1 entered for the company column in the row that contains the Property "MinorUpdateTargetRTM" and re-build your patch.

Check the InstallShield KB for more details.

Runtime Error 1328
Description - the following error message is displayed "Error applying patch to file [2]. It has been updated by another means, and can no longer be modified by this patch. For more information contact your patch vendor. System Error: [3]"

Quick Fix - Using Patch Design View:
  1. Verify that all files being updated by the patch exist on the machine. If they do not, then you cannot apply a byte-level patch. To function properly, a byte-level update requires the exact copy of the file it was created for on the target system. 
  2. Navigate to the Patch Design View and select the appropriate patch configuration. 
  3. Select the Advanced Tab and find the Include Whole File field in the Build Settings section. Set this field to Yes. 
  4. Finish building the patch and apply the new patch.
For details refer InstallShield KB

Runtime Error 1646:
Description:
Even you create a un-installable patch, patch may not be uninstallable and there will not be any entry in ARP Panel.
Solution:
In Direct editor make sure that there are no new entries in table ‘Create Folder’. If any new entries are there, delete them. If any extra folder is there, then it makes the patch uninstallable.

December 29, 2009

How do you create an un-installable Patch using InstallShield?

Patches are software updates designed to fix problems in the installed product by providing a modified file(s) / registry entry or new file(s). This post explains how to create an un-installlation patch (either an Update.exe or .msp file) using Installshield 2010.
Steps to Build the Latest MSI for Patch Creation

  1. Copy the Base Installer or previous Hot fix folder (ism file, staging area etc.,) to a separate folder.
  2. Rename the ism file to PRODv1.0SPxxHFyy.ism in the new folder (SPxxHFyy)
    • Rename the previous Hot fix folder also to PRODv1.0SPxxHFyy
    • Delete any folders (PRODv1.0SPxxHFyy -1) related to previous within it
  3. Open the ism file and modify the following• Summary Information Stream -> Title as “PROD 1.0 (v1.00.xxyy)”
    -  Product Properties -> Name as “PROD 1.0 (v1.00.xxyy)”
    -  Product Properties -> Version of the product 1.0.xxyy
  4. Generate new Package Code
  5. Create a Path Variable - <PATCHDESIGN> pointing to PatchDesign directory, which will point to the uncompressed msi and product files for base product as well as latest version.
  6. If the same Patch is executed for the second time, it should be able to detect and prompt that the PATCH is already applied. You can achieve this with the following steps
    "Add a VBScript Custom Action (stored in binary table) to check if the version information for current installer (PATCH) and the Base Installer (already installed) are same, then prompt a message saying that the upgrade is already installed and abort. "
  7. In Direct editor make sure that there are no new entries in table ‘Create Folder’. If any new entries are there, delete them. 
  8. Edit the Path variables for staging area and installer resources to point to appropriate folder.
  9. Build the latest MSI and this will be your "Latest Installer" for Patch Design.
Creating a new Patch
  1. Go to Media -> Patch Design. Right click and select ‘Add New Patch Configuration’. Rename the new ‘PatchConfiguration1’ in the format PRODVVSPxxHFyy (say PROD10SP02HF01).  
  • Common -> De-select “Create Update.exe”, if you wanted to create an update as .msp file.
  • Common -> Select “Allow Patch to be uninstalled”
  • Add the uncompressed Latest msi built earlier, for the latest setup path
  • Advanced -
    i. Generate Patch GUID – No
    ii. Note down the Patch GUID for command line uninstallation
    iii. Include Whole files – Yes
    iv. If this is the first HF for this product line and there is no major upgrade previously set Allow Product codes to differ – No otherwise set to Yes
    v. Include Win9x engine – No
    vi. Include WinNT engine - No
    vii. Minor Update to Target RTM version (MSI 3.1 Required) – Yes. By setting this option to Yes, you can include only the Base MSI under the previous patch section and safely ignore the other msi’s between the Base and the current Patch.
    viii. Msi Engine Version\Schema - Version 3.1 (requires Windows 2000 SP3 or greater)
   2.  Under Previous setups add uncompressed Base MSI
        [Note: Even for successive patches, it is sufficient to include only Base MSI under Previous setups since we have selected Minor Update to Target RTM version (MSI 3.1 Required) to Yes.]

Command Line Switches for MSI and MSP Installations / Uninstallations:
Click here for command line arguments and the silent switches that can be used for msi and msp (un-installable patches).
I will write shortly on few build-time / run-time errors thrown in patch creation process and the steps to resolve the same.

December 18, 2009

Creating an Installer for new Product? Consider these cool tips, if the updates will be Patches.

  • Make sure the component best practices are followed especially to create one component per binary (say exe, DLL, chm, xml etc.,)
  • An Exe Custom Action, which has to be executed only during Base uninstallation, please add the condition as REMOVE=”ALL” instead of Installed, because sometimes during Patch uninstallation, EXE custom action is executed ruining the installation on the system. This is a limitation with Windows Installer versions prior to 4.5. However if you are using Windows Installer 4.5, the n feature “Custom action execution on update uninstall” lets you to an update add or change a custom action so that the custom action is called when an update / patch is uninstalled.
  • Updating XML files and preserve the changes during Patch installation / uninstallation
 

December 15, 2009

When do you prefer Shared DLLs over Merge Modules?

Merge modules are similar in structure to a simplified Windows Installer, which helps to integrate shared code, files (DLLs / OCXs), resources, registry entries, and setup logic to applications as a single compound file.

Drawback of using downloadable Merge Modules while re-packaging: Most of the merge modules are present in their respective shared location, if not; it’s downloaded from the web. As the files integrated with the installer is from merge modules, it does not require isolation.
When you don’t find the proper network for the Share location on web during installation, then the application / installation fails to function. This is the main drawback of the Merge Modules. Shared DLL concept can be used to overcome this issue.
During the re-packaging process usually we don’t include the merge modules, that has to be downloaded during installation, in the WSI/MSI; this is to avoid the above mentioned network issues. The following screen shot shows how the merge modules will be excluded in the package:
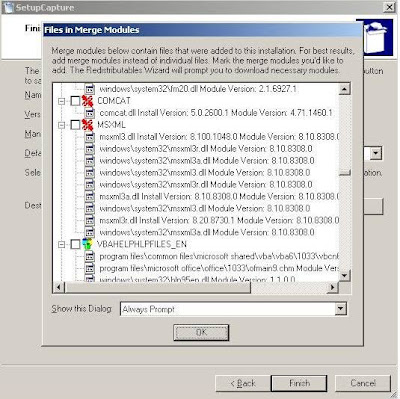
In this case the DLL/ OCX files will be included directly within the WSI/ MSI.

Shared DLLs:
All the DLLs captured in the WSI/ MSI will be a shared DLL. When a DLL is already present in the machine and if we install the application, the DLL of the same version increments its DLL counter. Since the DLLs from the MSI are shared DLLs, any new application that would be installed on the same machine in future will increment the corresponding DLL count. All the Shared DLL counts can be viewed from the following registry location:
HKEY_LOCAL_MACHINE\SOFTWARE\Microsoft\Windows\CurrentVersion\SharedDlls When there is a DLL conflict found using Wise Conflict Manager, we go for Isolation. This is named as DLL Redirection.

What is DLL Redirection?
Since an executable imports API functions from DLL files, DLL redirection allows us to tell a program that the DLLs it needs are located in a different directory than the originals; in this way we can create a DLL with the same name as the original, which exports the same function names as the original, but each function can contain the code of developer’s choice.

There are two ways to achieve DLL redirection;

  1. “dot local” redirection:
    “Applications can depend on a specific version of a shared DLL and start to fail if another application is installed with a newer or older version of the same DLL. There are two ways to ensure that your application uses the correct DLL: DLL redirection and side-by-side components. Developers and administrators should use DLL redirection for existing applications, because it does not require any changes to the application. “
    In other words, dot local DLL redirection affords developers the ability to force an application to use a different version of a particular DLL file than that used by the rest of the system. For example, if an application called oldapp.exe only worked with an outdated version of user32.dll, then instead of replacing the user32.dll file in the system32 directory (potentially causing many other applications to break), you could tell it to load the older version of user32.dll from the program's current directory by creating an appropriate dot local file. All other applications will still load the newer DLL from system32 and remain unaffected. All that is needed is to create a dot local file (which is simply an empty file whose name contains the name of the target application followed by a .local extension; in this case it would be oldapp.exe.local), and place it and the older version of user32.dll in the same directory as oldapp.exe.
    Limitations with “dot local” redirection:
    Most notably, according to MSDN, certain DLL files (called 'Known DLLs') cannot be redirected in Windows XP (this restriction does not apply to Windows 2000). A list of all Known DLLs can be found in the
    HKEY_LOCAL_MACHINE\SYSTEM\CurrentControlSet\Control\Session Manager\KnownDLLs key; included in the list of known DLLs are kernel32.dll, user32.dll and gdi32.dll. However, this is not true - it seems that under Windows XP, an application will either allow you to redirect any DLL, or none at all. As such, if targeting a program running on the Windows XP platform, dot local redirection is an unreliable method, and should be used only on Windows 2000 machines.
  2. Using Manifest Files:
    Manifest files use the same naming convention as dot local files (i.e., oldapp.exe.manifest), but are not empty files. They must contain certain XML-formatted information in order to function properly, or else the target application will fail to load. In addition, manifest files are only supported on Windows XP and Vista; however, they are far more reliable than using dot local redirection, and allow us to redirect any DLL file. (NOTE: The testing was done under Windows XP only; it is possible that some restrictions/changes may be applied to Windows Vista).

Window 2003 Server – “Service Unavailable” on IIS webpage

All of a sudden the web applications installed on Windows 2003 Server with IIS 6.0 stopped working.
  • Observed that IIS is running and all the windows services related to installed web application is up and running. 
  • Restarting IIS and web application related services was of no help. 
  • Enabling Isolation Mode (Web Sites Properties -> Services -> Isolation Mode -> Run WWW service in IIS 5.0 isolation mode).
Later on identified that Windows security updates installed on Dec 9th 2009 have caused the problem.

Solution:
Initially uninstalling the following Windows security updates and restarting the machine have fixed the issue.
KB976325
KB973904
KB973917
KB971737
KB974318
KB974392
Exploring further could help us narrow down that by just removing Windows Update KB973917, the 'Service Unavailable' issue will be resolved. However while removing it says KB974392 may not work properly. On resrting the machine IIS & WebApplications are working properly.